Mastering Sprint Reviews & Advanced Retrospectives
Jun 11, 2025
Introduction
Effective facilitation separates good Scrum Masters and agile coaches from exceptional ones. Beyond merely running meetings, advanced facilitators shape powerful interactions that drive alignment, surface hidden insights, and propel teams forward. In this guide, we’ll dive deep into two high-impact practices: Mastering Sprint Reviews: A Practical Guide and Advanced Retrospectives: Liberating Structures in Agile. You’ll learn how to design outcomes-focused ceremonies, weave in stakeholder collaboration, and employ dynamic techniques that keep teams engaged and continuously improving.
Mastering Sprint Reviews: A Practical Guide
Sprint reviews are more than demos—they’re your primary opportunity to validate product direction with real stakeholders. When facilitated masterfully, they transform into strategic forums for feedback, roadmap alignment, and shared vision.
Crafting an Engaging Agenda
A sprint review agenda should balance depth and pace to maintain energy and drive toward decisions. Here’s how to level up your 60-minute format:
- Context & Goal Framing (5 min)
- Visual Dashboard: Display key sprint metrics (velocity, burn-down, defect count) on-screen as the PO summarizes.
- User Stories Recap: Highlight the most critical 2–3 user stories or acceptance tests you’ll demo.
- Interactive Team Demos (30 min)
- Live Environment vs. Video: Whenever possible, demo in production-like environments. If stability is a concern, pre-record your walkthrough to avoid technical glitches—then switch to live for areas needing real-time interaction.
- Role Rotation: Alternate presenters—one developer shows functionality, the UX designer explains user flows, and the PO ties it back to business value. This keeps voices fresh and perspectives varied.
- Micro-Polls: After each demo segment, launch a quick 30-second poll (via tools like Slido or Mentimeter): “How confident are you that this meets user needs?” Capture on-screen results to spark concise discussion.
- Structured Stakeholder Feedback (15 min)
- Round-Robin Questions: Go around the virtual (or physical) room, giving each participant 30 seconds to voice their top insight or concern. This ensures quieter voices are heard.
- Dot Voting on New Ideas: Use a shared board (Miro, Mural) where participants have three virtual “dots” to allocate to feature ideas or improvements. The top-voted items become explicit backlog candidates.
- Next Steps & Roadmap Alignment (10 min)
- Backlog Preview Slide: Show the next 2–3 epics with tentative timelines. Ask stakeholders to flag any shifts in priority based on today's feedback.
- Action-Item Assignment: For each piece of feedback, assign a clear owner and due date (e.g., “UX to prototype error-page redesign by next Wednesday”). Capture these in your project tool in real time.
Pro Tip: Embed a visible countdown timer on the presentation deck or use a small on-screen progress bar in your meeting tool. This cues presenters and keeps each segment brisk.
Involving Stakeholders Effectively
Broad, meaningful participation turns a review into a co-creation session. Here’s how to engage and empower every stakeholder:
- Identify & Invite the Right Mix:
- Core Team: PO, Scrum Master, Tech Lead, UX Lead.
- Business Partners: Sales reps who sell the feature, Customer Success who handle support tickets, Marketing who needs launch input.
- External Voices: If feasible, invite one or two end users (power users, beta testers) to provide raw reactions.
- Pre-Review Surveys & Ideation:
- Targeted Questionnaires: Send a 3-question form 2 days before the review—e.g., “What’s your biggest open question about Feature X?”, “What’s one metric you’d like to see?”
- Synthesis Report: Combine responses into a one-slide “Top 5 Stakeholder Questions” to drive the demo focus.
- Role-Based Breakouts for Large Groups:
- Parallel Tracks: For 15+ attendees, split into 3 breakout rooms, each with a 20-minute guided discussion:
- Room A: Business Impact & Metrics
- Room B: UX & Usability
- Room C: Technical Architecture & Scalability
- Facilitator Guide: Provide each room with 3 facilitation questions and a shared digital canvas to capture notes. Reconvene and have each room deliver a 2-minute summary.
- Ensure Psychological Safety:
- Kickoff Icebreaker: Start with a quick “What’s one thing you appreciated this sprint?” to build a positive tone.
- Anonymous Feedback Option: Offer a Slack poll or anonymous form for sensitive comments, then address themes aloud to show you value candor.
- Follow-Up Engagement:
- Summary Email: Within 24 hours, send a concise recap: completed demos, voted ideas, assigned action items, and updated backlog links.
- Feedback Loop Closure: In your next sprint review invite, call out “Thanks to last week’s feedback on the error flow, we’ve updated the prototype—demo at minute 10.”
By thoughtfully orchestrating your stakeholder involvement—from precise invites and pre-work to dynamic workshops and fast follow-through—you elevate your sprint review into a strategic alignment engine that drives both engagement and outcomes.
Visual Storytelling & Evidence-Driven Demos
Effective demos aren’t just about clicking through features—they’re about crafting a narrative that resonates with real users and backing it up with data. To elevate your sprint review:
- Build a Compelling Persona Arc
Instead of a generic “Here’s Feature X,” open with a vivid character sketch: - Introduce “Jane the First-Time Shopper”: Describe her context—she’s on mobile, short on time, worried about hidden fees.
- Map Her Journey: Show Jane’s steps in a simple flowchart—“Discovery → Comparison → Checkout” with pain points at each step.
- Anchor the Demo: Tie every new increment back to how it helps Jane—e.g., “Now, she sees real-time fee estimates before tapping ‘Pay.’”
- Embed Live Metrics & Visuals
Data brings stories to life. Integrate analytics right into your demo environment: - Real-Time Dashboards: Use tools like Grafana panels or Google Analytics reports embedded in your staging site, displaying key metrics (task completion time, error counts) as you step through the flow.
- Heatmaps & Session Replays: Show a quick Hotjar heatmap of where users clicked most before and after the change, or play a 10-second session replay highlighting where users hesitated.
- Before-After Side-by-Side Comparisons
A split-screen video is a powerful attention grabber: - Record the Old Flow: Screen-record the legacy checkout process, noting friction points (e.g., “three extra clicks to confirm shipping”).
- Record the New Flow: Immediately beside it, showcase the streamlined version.
- Annotate Key Gains: Overlay call-outs (“–50% clicks,” “–30s load time,” “+15% conversion rate”) so viewers see the concrete improvements.
- Use Visual Aids & Storyboards
- Storyboard Slides: Before diving into code, flash a two-panel storyboard illustrating Jane’s frustration, then relief after the update.
- Emphasize Emotion: Include a single quote from a usability test—“I almost gave up before seeing my total”—to humanize the data.

Handling Feedback & Follow-Ups
Capturing feedback is just the first step—closing the loop is what turns stakeholder input into real progress and trust.
- Real-Time Capture with Structured Templates
- Customized Feedback Cards: Create a digital template in Miro or Trello with fields for “Issue,” “Impact,” “Suggested Fix,” and “Priority.” As feedback comes in, a dedicated scribe fills out each card, ensuring nothing is lost.
- Time-Stamped Notes: Encourage facilitators to note the exact timestamp or demo slide when the comment was made, so it’s easy to replay and understand context later.
- Affinity Mapping & Thematic Clustering
- Dot-Voting for Urgency: After the demo, group cards into “Bugs,” “UX Improvements,” and “New Feature Ideas.” Give each attendee 3 votes to allocate across the board, surfacing the items the group cares about most.
- Kano Analysis Workshop: For high-impact suggestions, run a quick Kano exercise—classify items as “Must-have,” “Performance,” or “Delighter.” This helps balance immediate fixes with longer-term innovation.
- Prioritization & Backlog Integration
- Automated Backlog Sync: Use an integration (e.g., Miro → Jira plugin) to push top-voted cards directly into your sprint backlog, complete with labels and story point placeholders.
- Assign Owners Immediately: For each top-three item, assign a clear owner and due date during the review. Hearing “UX will prototype this by Wednesday” builds accountability on the spot.
- Feedback Loop Closure & Communication
- Mid-Sprint Check-In: In the next daily stand-up, allocate 2 minutes to “Sprint Review Follow-Up”—confirm which feedback items have moved into the current sprint and who’s working on them.
- Stakeholder Update Email: Within 24 hours, email a concise recap:
- What we heard: Top 3 themes.
- What we did: Stories created/assigned.
- Next steps: When you’ll see these improvements.
- Demo the Fixes: In your subsequent sprint review, explicitly label the demo “Items from last sprint’s feedback” so participants see their input was valued and acted upon.
Pro Tip: Use a lightweight “Feedback Dashboard” on Confluence or your team wiki to track progress on all review-generated items. Include status badges (Open, In Progress, Done) and live links to the relevant tickets.
By elevating feedback capture into a structured, seen-to-completion process, you not only improve your product incrementally but also reinforce stakeholders’ trust that sprint reviews are a genuine forum for influence and collaboration.
Advanced Retrospectives: Liberating Structures in Agile
Standard retrospectives (Start/Stop/Continue) can become routine. Liberating Structures inject variety and depth, enabling teams to surface insights, solve complex challenges, and foster psychological safety.
Why Move Beyond “Start/Stop/Continue”
While familiar, basic retro formats often yield surface-level observations and can disengage veteran teams. Advanced retrospectives aim to:
- Unlock deeper patterns and systemic issues.
- Empower every voice—including quieter participants—through structured interaction.
- Generate actionable, high-impact improvement experiments.
Introduction to Liberating Structures
Liberating Structures is a collection of 33 micro-structures that guide group conversations. Key principles include rapid rounds of participation, shifting between divergent and convergent thinking, and minimal facilitator overhead.
Key Techniques for Agile Teams
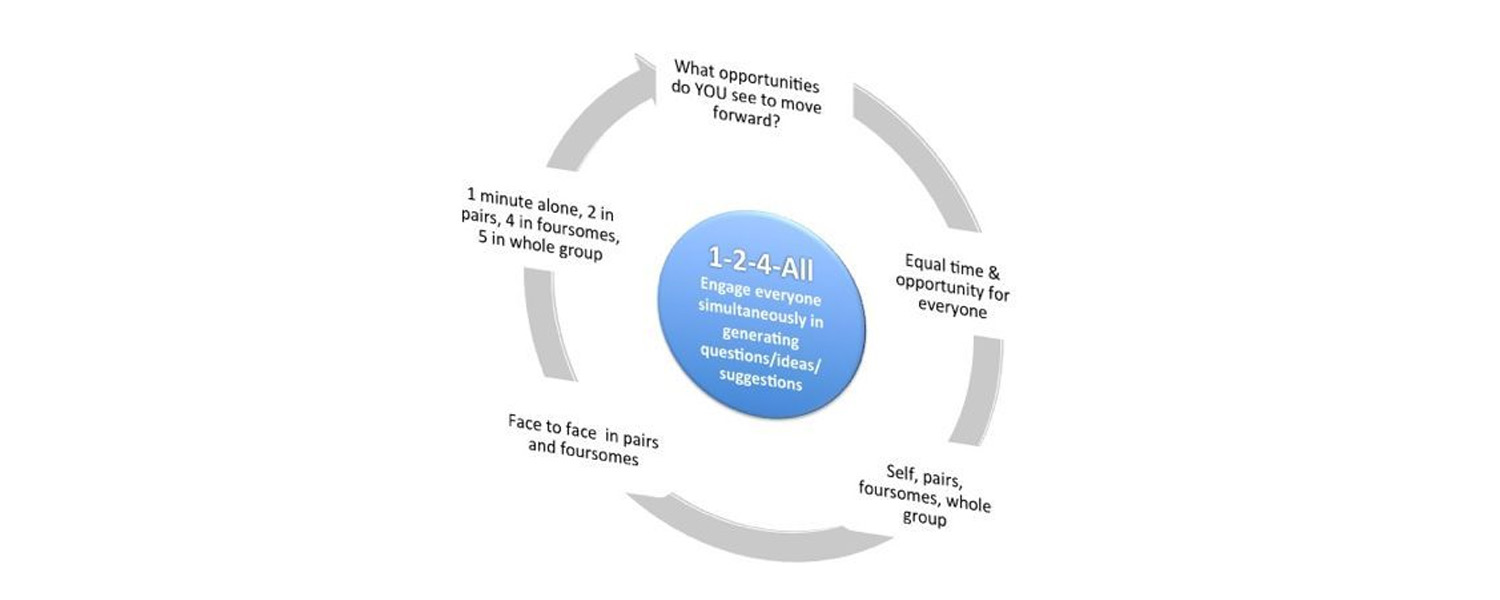
1-2-4-All (Divergent & Convergent Thinking)
- Phase 1 (1 min): Individuals silently reflect on a prompt (e.g., “What systemic obstacle slowed us this sprint?”).
- Phase 2 (2 min): Pairs discuss and synthesize top ideas.
- Phase 3 (4 min): Groups of four combine insights.
- Phase 4 (All, 10 min): Whole team shares main themes and votes on top priorities.
This structure unleashes rich ideation while ensuring every attendee contributes equally.
Troika Consulting (Peer Coaching)
- Step 1 (5 min): One participant (Client) describes a challenge they faced.
- Step 2 (5 min): Two peers (Consultants) ask clarifying questions, then offer practical advice.
- Rotate: Move to the next Client until all have consulted and been consulted.
Troika fosters peer learning, surface-level speed bumps, and cross-pollination of facilitation practices.
Designing Retrospectives for High Engagement
- Alternate Techniques: Rotate between Liberating Structures to keep sessions fresh.
- Time-Box Rigorously: Use visible timers and clear stage transitions.
- Hybrid Inclusivity: For distributed teams, leverage digital tools (MURAL, Jamboard) with built-in Liberating Structures templates.
Measuring Retrospective Effectiveness
Track your retro ROI by monitoring:
- Action Item Completion Rate: Percentage of retro-derived tasks closed by the next retro.
- Team Sentiment Trends: Use quick pulse surveys (e.g., “On a scale of 1–5, how safe did you feel sharing this retro?”) each sprint.
- Cycle Time Improvements: Correlate retro actions (automation, process tweaks) with downstream metrics like lead time or defect escape rate.
Regular measurement ensures retrospectives drive continuous improvement rather than become ceremonial.
Best Practices & Tips
- Blend Familiar and Novel: Start with a quick “Start/Stop/Continue” warm-up before diving into a new Liberating Structure.
- Align with Team Maturity: Less experienced teams may need simpler formats; gradually introduce more complex structures.
- Prepare Materials in Advance: Pre-load digital boards with templates, timers, and clear prompts.
- Document & Share Outcomes: Publish retro summaries—action items, owners, due dates—in a shared space to maintain accountability.
Conclusion
Mastering advanced facilitation techniques elevates sprint reviews from status updates to strategic alignment sessions and transforms retrospectives into powerful engines of team learning. By adopting outcome-focused agendas, dynamic Liberating Structures, and rigorous follow-through, Scrum Masters and agile coaches can unlock deeper engagement, foster trust, and drive measurable improvements.
Ready to advance your facilitation skills? Enroll in our Product Owner & Product Manager course, where you’ll master these and other high-impact techniques to lead agile teams with confidence and achieve extraordinary results.
Stay connected with news and updates!
Join our mailing list to receive the latest news and updates from our team.
Don't worry, your information will not be shared.
We hate SPAM. We will never sell your information, for any reason.

